간단한 클로저 웹 애플리케이션 만들기
클로저 웹 개발을 시작하려는 이에게 소개할 만한 튜토리얼을 찾기 힘들었다. 어떤 것은 오래되었고, 어떤 것은 내용이 많았다. 그래서 몇몇 튜토리얼을 참고하여 하나 만들었다.
미니 방명록 만들기이다. 해보자.
프로젝트 생성
$ lein new compojure mini-guestbook
웹 서버 실행
$ cd mini-guestbook
$ lein ring server
위 명령을 실행하면 브라우저에서 새 창이 열리고, “Hello World”가 보인다. 이제 최소한의 웹 서버를 만든 것이다.
코드 확인
src/mini_guestbook/handler.clj를 열어보자. 다음과 같다.
(ns mini-guestbook.handler
  (:require [compojure.core :refer :all] ; (1)
            [compojure.route :as route] ; (1)
            [ring.middleware.defaults :refer [wrap-defaults site-defaults]]))

(defroutes app-routes
  (GET "/" [] "Hello World") ; (2)
  (route/not-found "Not Found")) ; (3)

(def app
  (wrap-defaults app-routes site-defaults))
- (1) Compojure라는 라이브러리를 사용한다.
- (2) ‘/’ 경로로 요청하면 “Hello World” 문자열을 반환하는 라우트를 만든다.
- (3) 정의하지 않는 경로로 요청하면 “Not Found” 문자열을 반환하는 라우트를 만든다.
Compojure는 Ring이라는 더 하위 레벨의 라이브러리에 라우팅 처리를 추가하는 작은 라이브러리이다. Ring은 HTTP 요청과 응답을 클로저 맵 형식으로 추상화하는 라이브러리로, 대부분의 클로저 웹 애플리케이션에서 사용된다. 기본적인 웹 서버(Jetty)를 포함하고, 다른 종류의 웹 서버도 쉽게 붙일 수 있다. 어떤 웹 서버를 붙이더라도, 응답과 요청을 동일한 방식으로 처리한다.
Hiccup 라이브러리 추가
현재 보이는 “Hello World” 보다 더 복잡한 HTML을 만들어 보자. Hiccup 라이브러리를 사용한다. Hiccup은 클로저 자료구조를 HTML로 변환한다. Hiccup은 클로저에서 HTML을 만드는 가장 간단한 방법 중 하나이다. Hiccup을 사용하기 위해 project.clj 파일의 :dependencies에 [hiccup "1.0.5"]를 추가하자. 수정한 project.clj는 다음과 같다.
(defproject mini-guestbook "0.1.0-SNAPSHOT"
  :description "FIXME: write description"
  :url "http://example.com/FIXME"
  :min-lein-version "2.0.0"
  :dependencies [[org.clojure/clojure "1.7.0"]
                 [compojure "1.4.0"]
                 [ring/ring-defaults "0.1.5"]
                 [hiccup "1.0.5"]]
  :plugins [[lein-ring "0.9.7"]]
  :ring {:handler mini-guestbook.handler/app}
  :profiles
  {:dev {:dependencies [[javax.servlet/servlet-api "2.5"]
                        [ring/ring-mock "0.3.0"]]}})
Hiccup이 어떻게 작동하는지 REPL로 확인해 보자.
$ lein repl
다음처럼 실행한다.
user=> (require '[hiccup.core :as h])
nil
user=> (h/html [:h1 "Hello World"])
"<h1>Hello World</h1>"
화면 만들기
이제, 방명록 화면을 만들자. src/mini_guestbook/handler.clj를 수정한다. 수정한 파일은 다음과 같다.
(ns mini-guestbook.handler
  (:require [compojure.core :refer :all]
            [compojure.route :as route]
            [ring.middleware.defaults :refer [wrap-defaults site-defaults]]
            [hiccup.core :refer (html)]
            [hiccup.form :as form]
            [hiccup.page :as page]
            [ring.util.anti-forgery :as anti-forgery]))

(defn add-form [] ; (3)
  (form/form-to [:post "/add"]
             (anti-forgery/anti-forgery-field)
             (form/text-area {:rows 2 :cols 30} "message") [:br]
             (form/submit-button "전송")))

(defn messages []
  '({:message "테스트1"} {:message "테스트2"})) ; (5)

(defn message-list [] ; (4)
  [:ul
   (map (fn [x] [:li (:message x)])
        (messages))])

(defn index [] ; (2)
  (html
    [:head
     [:title "방명록"]]
    [:body
     [:h1 "방명록"]
     (add-form)
     [:h2 "메시지"]
     (message-list)]))

(defroutes app-routes
           (GET "/" [] (index)) ; (1)
           (route/not-found "Not Found"))

(def app
  (wrap-defaults app-routes site-defaults))
- (1) “Hello World” 대신 index 함수의 결과를 반환한다.
- (2) Hiccup으로 HTML을 만든다.
- (3) 방명록 입력 form을 만든다.
- (4) 방명록 메시지를 리스트 형식으로 보여준다.
- (5) 잘 보이는지 테스트하기 위해 미리 방명록 메시지를 입력해 둔다.
새로운 라이브러리를 추가했기 때문에 이를 내려받으려면 웹 서버를 다시 시작해야 한다. lein ring server를 다시 실행하면 방명록 화면이 나타난다.
화면 꾸미기
CSS로 화면을 조금 더 이쁘게 만들자. resources/public에 다음 내용의 styles.css 파일을 만들자.
body {
    background-color: Cornsilk;
}

textarea {
    font-size: 120%;
}

input[type=submit] {
    width: 60px;
    margin: 5px 0px;
    font-size: 120%;
}

h1 {
    color: CornflowerBlue;
}
HTML에 이 CSS 파일을 적용하기 위해 src/mini_guestbook/handler.clj 파일에 (page/include-css "/styles.css") 코드를 다음처럼 추가하자.
(defn index []
  (html
    [:head
     [:title "방명록"]
     (page/include-css "/styles.css")]
    [:body
     [:h1 "방명록"]
     (add-form)
     [:h2 "메시지"]
     (message-list)]))
브라우저 창을 다시 로딩하자. 화면이 바뀐 것을 볼 수 있다.
전송한 메시지를 받는 라우트 추가
방명록 메시지를 입력한 후 전송해보자. 그러면 “Not Found”가 나타난다. 이유는 add-form 함수에서 전송한 방명록 메시지를 받을 수 있는 라우트가 아직 없어서다. 코드를 추가하자.
(ns mini-guestbook.handler
  (:require [compojure.core :refer :all]
            [compojure.route :as route]
            [ring.middleware.defaults :refer [wrap-defaults site-defaults]]
            [hiccup.core :refer (html)]
            [hiccup.form :as form]
            [hiccup.page :as page]
            [ring.util.anti-forgery :as anti-forgery]
            [ring.util.response :as resp])) ; (3)

...

(defn add [message]
  (println message) ; (2)
  (resp/redirect "/")) ; (3)

(defroutes app-routes
           (GET "/" [] (index))
           (POST "/add" [message] (add message)) ; (1)
           (route/not-found "Not Found"))

...
- (1) ‘/add’ 경로에 POST 형식으로 들어오는 메시지를 처리하는 라우트를 추가했다.
- (2) 메시지가 잘 들어오는지 확인하기 위해 출력한다.
- (3) 처리가 끝나면 ‘/’ 경로로 다시 가도록 한다.
브라우저에서 http://localhost:3000/ 주소로 다시 간다. “안녕하세요”를 입력하고 전송하면 명령창에 그 메세지가 출력되는 것이 보인다.
$ lein ring server
2015-12-06 15:14:32.729:INFO:oejs.Server:jetty-7.6.13.v20130916
2015-12-06 15:14:32.767:INFO:oejs.AbstractConnector:Started SelectChannelConnector@0.0.0.0:3000
Started server on port 3000
안녕하세요
데이터베이스 초기 설정
받은 메시지를 저장하기 위해 데이터베이스를 사용한다. H2라는 작은 SQL 데이터베이스를 사용하여 파일 형식으로 저장한다. 그리고 clojure.java.jdbc라는 라이브러리를 사용해 프로그램에서 H2와 연결한다. project.clj의 :dependencies에 관련 라이브러리를 추가하자.
  :dependencies [[org.clojure/clojure "1.7.0"]
                 [compojure "1.4.0"]
                 [ring/ring-defaults "0.1.5"]
                 [hiccup "1.0.5"]
                 [org.clojure/java.jdbc "0.4.2"]
                 [com.h2database/h2 "1.4.188"]]
REPL에서 데이터베이스의 초기 설정을 하자.
$ lein repl
jdbc 라이브러리를 불러들이자.
user=> (require '[clojure.java.jdbc :as sql])
nil
h2 접속 정보를 h2-db라는 이름으로 만들어둔다.
user=> (def h2-db {:dbtype "h2"
                   :dbname "./mini_guestbook_h2"})
#'user/h2-db
guestbook 테이블을 만들자. 그러면 프로젝트 루트에 mini_guestbook_h2.mv.db라는 데이터베이스 파일이 생긴다.
user=> (sql/db-do-commands h2-db
                             "CREATE TABLE guestbook (message VARCHAR(128))")
(0)
테스트를 위해 메시지 두 개를 데이터베이스에 넣자.
user=> (sql/insert! h2-db
                    :guestbook {:message "hello1"})
(nil)
user=> (sql/insert! h2-db
                    :guestbook {:message "hello2"})
(nil)
메세지가 잘 들어갔는지 확인해보자.
user=> (sql/query h2-db
                  "select * from guestbook")
({:message "hello1"} {:message "hello2"})
잘 된다.
데이터베이스의 메시지 가져와서 보이기
다음처럼 수정한다.
(ns mini-guestbook.handler
  (:require [compojure.core :refer :all]
            [compojure.route :as route]
            [ring.middleware.defaults :refer [wrap-defaults site-defaults]]
            [hiccup.core :refer (html)]
            [hiccup.form :as form]
            [hiccup.page :as page]
            [ring.util.anti-forgery :as anti-forgery]
            [ring.util.response :as resp]
            [clojure.java.jdbc :as sql])) ; (1)

(def h2-db {:dbtype "h2" ; (2)
            :dbname "./mini_guestbook_h2"})

...

(defn messages []
  (sql/query h2-db ; (3)
             "select * from guestbook"))

...
- (1) jdbc 라이브러리를 사용한다.
- (2) h2 연결 정보를 h2-db라는 이름으로 만든다.
- (3) 코드에 하드코딩된 기존 메시지를 없애고, 데이터베이스에서 메시지를 가져온다.
lein ring server를 다시 실행하여 화면을 재로딩한다. 메시지가 기존의 “테스트1”, “테스트2”에서 “hello1”, “hello2”로 바뀐 것을 확인할 수 있다.
데이터베이스에 메시지 저장하는 코드 추가
add 함수를 다음처럼 수정한다.
(defn add [message]
  (println message)
  (sql/insert! h2-db
               :guestbook {:message message})
  (resp/redirect "/"))
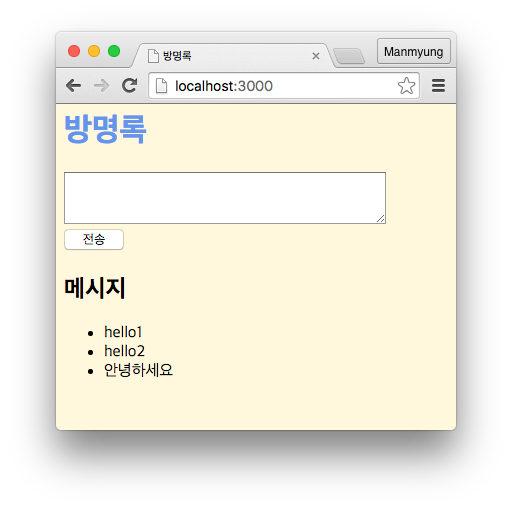
브라우저 창을 다시 로딩한다. 이제 “안녕하세요”를 다시 전송하면 밑의 리스트에 추가된다.
미니 방명록 완성!
완성된 화면
전체 코드
project.clj
(defproject mini-guestbook "0.1.0-SNAPSHOT"
  :description "FIXME: write description"
  :url "http://example.com/FIXME"
  :min-lein-version "2.0.0"
  :dependencies [[org.clojure/clojure "1.7.0"]
                 [compojure "1.4.0"]
                 [ring/ring-defaults "0.1.5"]
                 [hiccup "1.0.5"]
                 [org.clojure/java.jdbc "0.4.2"]
                 [com.h2database/h2 "1.4.188"]]
  :plugins [[lein-ring "0.9.7"]]
  :ring {:handler mini-guestbook.handler/app}
  :profiles
  {:dev {:dependencies [[javax.servlet/servlet-api "2.5"]
                        [ring/ring-mock "0.3.0"]]}})
src/mini_guestbook/handler.clj
(ns mini-guestbook.handler
  (:require [compojure.core :refer :all]
            [compojure.route :as route]
            [ring.middleware.defaults :refer [wrap-defaults site-defaults]]
            [hiccup.core :refer (html)]
            [hiccup.form :as form]
            [hiccup.page :as page]
            [ring.util.anti-forgery :as anti-forgery]
            [ring.util.response :as resp]
            [clojure.java.jdbc :as sql]))

(def h2-db {:dbtype "h2"
            :dbname "./mini_guestbook_h2"})

(defn add-form []
  (form/form-to [:post "/add"]
             (anti-forgery/anti-forgery-field)
             (form/text-area {:rows 2 :cols 30} "message") [:br]
             (form/submit-button "전송")))

(defn messages []
  (sql/query h2-db
             "select * from guestbook"))

(defn message-list []
  [:ul
   (map (fn [x] [:li (:message x)])
        (messages))])

(defn index []
  (html
    [:head
     [:title "방명록"]
     (page/include-css "/styles.css")]
    [:body
     [:h1 "방명록"]
     (add-form)
     [:h2 "메시지"]
     (message-list)]))

(defn add [message]
  (println message)
  (sql/insert! h2-db
               :guestbook {:message message})
  (resp/redirect "/"))

(defroutes app-routes
           (GET "/" [] (index))
           (POST "/add" [message] (add message))
           (route/not-found "Not Found"))

(def app
  (wrap-defaults app-routes site-defaults))
추가 작업
웹 서버의 포트를 바꾸고 싶거나, 배포를 위해 jar 또는 war 파일을 만들려면 https://github.com/weavejester/lein-ring/blob/master/README.md 를 참고하라.
참고
다음을 참고하여 글을 썼다.